Drone photogrammetry refers to the use of drones to capture aerial imagery that is then processed to create 3D models and maps of physical spaces.

We’ve created this guide to help you learn the basics of drone photogrammetry.
The guide is organized as a step-by-step. We start at the very beginning with buying the right drone for photogrammetry, then go through legal requirements, software, and skill building, ending on your first mission doing aerial photogrammetry.
We’ve also included supporting resources to help you dive deeper, including a glossary of terms and an FAQ.
Here’s a table of contents in case you’d like to jump around within this guide:
- Introduction: Understanding Photogrammetry—And How Drones Have Changed Everything
- Chapter 1: Choosing a Photogrammetry Drone
- Chapter 2: Understand the Legal Requirements for Drone Photogrammetry
- Chapter 3: Master Basic Drone Flying Skills
- Chapter 4: Choose Your Drone Photogrammetry Software
- Chapter 5: Learn the Basics of Drone Photogrammetry
- Chapter 6: Plan Your First Drone Photogrammetry Mission
- Chapter 7: Process Your Drone Data
Here are supporting resources:
- Drone Photogrammetry FAQ
- Drone Photogrammetry Glossary
- Types of Drone Photogrammetry Data Outputs
- Industries that Use Drone Photogrammetry
Understanding Photogrammetry—And How Drones Have Changed Everything
Photogrammetry is the science of making measurements from photographs. This technique uses photos to create maps or 3D models of real-world objects or scenes, capturing intricate details by processing multiple overlapping photographs taken from different angles.
In the last ten years, drone technology has radically changed photogrammetry.
Why? Put simply, drones have made it much easier and more cost-effective to collect aerial imagery, especially in hard-to-reach areas or large areas.

Credit: Wingtra
Unlike traditional methods for data collection, which may require manned aircraft and complex setups, drones can be deployed quickly and provide high-resolution data that supports more frequent and detailed analysis.
[Related read: What Is the Difference Between Absolute and Relative Location?]
This accessibility has expanded the application of photogrammetry across a range of fields, including agriculture, archaeology, construction, and environmental monitoring, empowering professionals to obtain accurate, actionable data without the substantial costs and logistical challenges previously associated with aerial surveying.
Moreover, the integration of advanced sensors and cameras on drones has continued to enhance the precision and quality of data collected. Today, drones are an indispensable tools in the photogrammetry toolkit.
A Note on Drone Photogrammetry vs. LiDAR for 3D Mapping
3D maps can be made using either photogrammetry or LiDAR data. This can be confusing, because sometimes when people are talking about 3D models made with drone data they’re talking about LiDAR, and sometimes they’re talking about photogrammetry.
Keep reading for a quick overview on the key differences, and how to navigate choosing between the two.
Drone Photogrammetry
Photogrammetry uses images captured by drones to create 3D models and maps. It’s highly effective in well-lit conditions where high-resolution visual detail is required. The technology is more cost-effective compared to LiDAR and is accessible for projects with smaller budgets.
- Advantages. Cost-efficient, provides high-resolution imagery, good for mapping in visible light conditions.
- Limitations. Less effective in low light or where obstructions prevent clear imagery, such as in dense forests.
LiDAR with Drones
LiDAR technology uses laser light to scan the ground and objects to create detailed 3D models. It excels in areas where photogrammetry might struggle, such as low-light environments or when mapping complex geometries like forests, where foliage can obstruct visible light imaging.
- Advantages. Highly accurate in diverse conditions, can penetrate obstacles like foliage, and is effective in both day and night.
- Limitations. Historically more expensive than photogrammetry, though costs have been decreasing, making it more accessible and popular.
So Which Should You Choose?
Despite the rise in popularity of LiDAR due to its increased accessibility and reduced cost, photogrammetry remains a viable and widely used method for creating 3D models, especially in projects where visual detail and color are important.
The choice between drone photogrammetry and LiDAR will depend on the specific requirements of your 3D mapping project, including your budget, terrain complexity, and the level of detail required in the final output.
1. Choose Your Photogrammetry Drone
Now that we’ve covered the basics, let’s start our step-by-step journey to get you ready to carry out a drone photogrammetry mission.
We’re going to start things off with choosing your drone.
Choosing the best drone for photogrammetry is crucial to achieving high-quality, accurate results. Here are some key criteria to consider when looking for a good photogrammetry drone:
- Camera quality. Look for drones with high-resolution cameras to capture detailed images.
- Stability and flight time. Stability in flight ensures quality image capture, and longer flight times allow for extensive area coverage.
- GPS accuracy. High GPS accuracy is essential for precise geotagging of images.
- Payload capacity. The ability to carry high-quality sensors and cameras can enhance the effectiveness of photogrammetry work.
- Software compatibility. Ensure the drone is compatible with leading photogrammetry software for seamless data processing.
The 5 Best Drones for Photogrammetry [Fresh for 2024]
Here are five of the best drones for photogrammetry, listed in order from least to most expensive.
Note: This list is not exhaustive. There are many other drones out there that are good options for photogrammetry—these are just our top five for this year.
1. DJI Mini 3 Pro
Adjust Settings for Optimal Imaging
Configure your drone’s camera settings to suit the specific requirements of photogrammetry:
- Resolution. Set your camera to the highest resolution possible to capture detailed images required for precise measurements.
- Overlap. Adjust the overlap settings of your images to at least 60% for horizontal (nadir) photos and 70-80% for oblique photos. High overlap ensures that the photogrammetry software can accurately reconstruct the 3D model.
Software Assistance
Use drone mapping software that offers real-time data and feedback on the flight plan, battery life, and sensor status. Doing this can greatly enhance your efficiency and accuracy in the field.
Practicing these skills regularly will not only improve your proficiency in basic drone operations but also equip you with the techniques you need to do drone photogrammetry effectively.
Credit: DroneDeploy
4. Choose Your Drone Photogrammetry Software
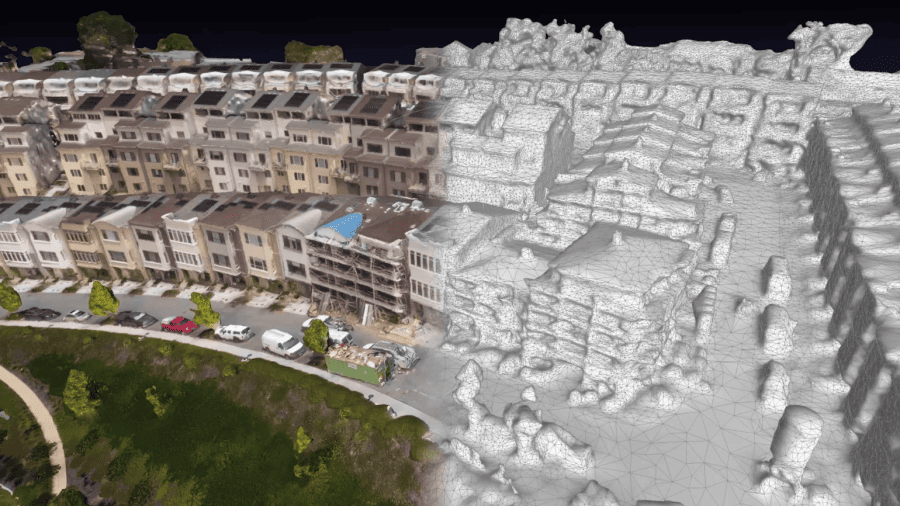
Drone photogrammetry software is crucial for processing the images captured during flights into accurate, measurable, and usable 3D models and maps.
How Drone Photogrammetry Software Works
Photogrammetry software processes sequences of overlapping images taken by drones, extracting geometric information to create 3D models and maps.
This software uses techniques such as Structure from Motion (SfM) and photogrammetric processing, which stitch together photos based on shared features and compute precise 3D coordinates.
Outputs from Drone Photogrammetry Software
Drone photogrammetry software provides a range of outputs. Here are the primary ones people use:
- 3D models. Detailed and scalable 3D representations suitable for construction, architecture, and archaeology.
- Topographic maps. High-resolution maps useful for environmental monitoring and land management.
- Volume calculations. Essential for stockpile monitoring and cut-and-fill measurements in mining and construction.
The 3 Best Drone Photogrammetry Software Options
Choosing the right photogrammetry software depends on your specific project needs, budget, and the level of detail required. Evaluate these options based on their features, usability, and integration capabilities with your drone hardware.
Note: As with the drone models listed above, this list of drone photogrammetry software options is not at all exhaustive.
Here are three of the leading photogrammetry software solutions on the market, organized by price range and skill level.
1. DroneDeploy

- Price. Entry-level to Mid-range
- Features. User-friendly interface, real-time mapping, and cloud-based processing. Suitable for beginners and intermediate users.
2. Agisoft Metashape
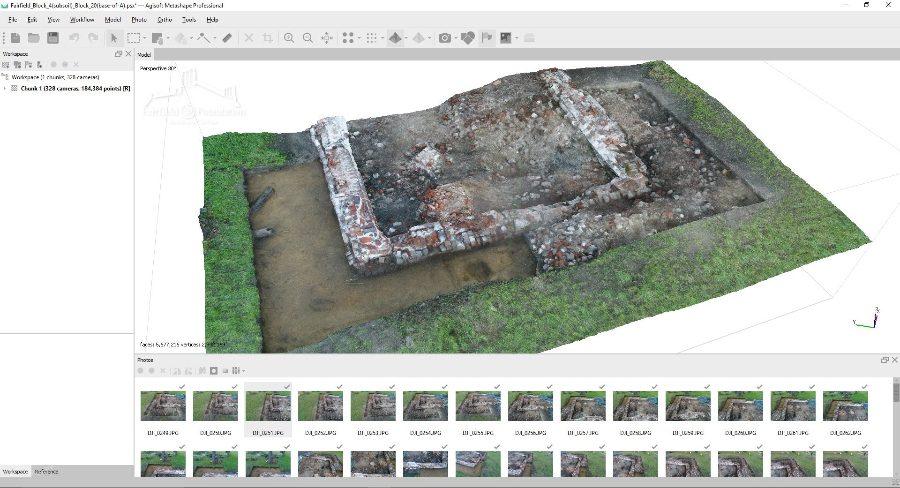
- Price. Mid-range
- Features. Offers powerful 3D reconstruction technology, capable of processing large datasets and providing detailed texture mapping.
Learn more about Agisoft Metashape.
3. Pix4Dmapper

- Price. High-end
- Features. Robust processing options, cloud integration, and extensive support for multispectral and thermal imagery. Ideal for professionals needing precise, survey-grade results.
5. Learn the Basics of Drone Photogrammetry
Drone photogrammetry is not just about flying a drone—it’s also mastering the specific skills needed to capture and process high-quality geographical data.
To master aerial photogrammetry, you have to understanding the nuances of camera settings, flight patterns, and data processing.
Step-by-Step Learning Guide
1. Understand the basics of photogrammetry. Familiarize yourself with the fundamental concepts of using drones to create 3D maps and models.
2. Explore camera and sensor technology. Learn about different types of cameras and sensors that affect the quality of photogrammetric data.
3. Practice capturing images. Gain practical experience in capturing images from different angles and altitudes to ensure comprehensive coverage of the surveyed area.
4. Learn data processing. Understand the software tools available for converting images into precise 3D models and how to troubleshoot common issues.
5. Implement advanced techniques. As your skills advance, explore more complex photogrammetry techniques such as using Ground Control Points (GCPs) for greater accuracy.
Learn Advanced Photogrammetry Techniques
Advancing your skills in drone photogrammetry involves mastering more complex techniques that can significantly enhance the quality and utility of your mapping projects.
- 3D modeling. Learn to create detailed 3D models from your aerial imagery. This involves using software like Agisoft Metashape or Autodesk ReCap to process images into textured 3D meshes.
- Multispectral imaging. Utilize multispectral sensors to capture data beyond the visible spectrum. This technique is particularly valuable in agriculture, environmental monitoring, and land management.
- Thermal imaging. Incorporate thermal cameras to detect heat variations. This is useful for inspections, search and rescue operations, and energy audits.
- Volume calculations. Master techniques to calculate volumes for stockpiles or excavations, which are crucial in construction and mining industries.
- Integration with GIS. Learn how to integrate your photogrammetry data with Geographic Information Systems (GIS) for enhanced spatial analysis and decision-making.
Expanding your repertoire with these advanced techniques not only broadens your service offerings but also increases your value as a drone photogrammetry professional. Consider taking specialized courses or workshops to gain these skills effectively.
Take Our Drone Mapping Essentials Course
Want to master drone photogrammetry?
We created a comprehensive online course designed to provide commercial drone pilots with an in-depth understanding of drone mapping and photogrammetry.
The course covers everything from basic drone operation to advanced mapping techniques, including:
- Step-by-step instructions. Detailed walkthroughs of each process in drone photogrammetry.
- Expert tutorials. Learn from industry experts through high-quality video tutorials and hands-on projects.
- Practical applications. Apply your learning in real-world scenarios to build confidence and proficiency.
Learn more about the Drone Mapping Essentials Course.
6. Fly Your First Drone Photogrammetry Mission
Embarking on your first drone photogrammetry mission requires careful planning to ensure success. Here’s a step-by-step guide to help you get ready.
Preparing for the Mission
- Define the project scope. Start by clearly defining what you want to achieve with your photogrammetry project. Determine the area to be mapped and the level of detail required. This will guide your decisions on the type of drone, camera resolution, and flight patterns you should use.
- Select the right location. Choose a location that suits your project requirements. Consider factors such as accessibility, no-fly zones, and potential obstacles that could affect drone flights. Do your airspace research with a LAANC app or the FAA’s B4UFLY app.
- Check weather conditions. Collecting aerial data for photogrammetry requires stable weather. Plan your flights for days with minimal wind and good lighting conditions to ensure high-quality data capture. Avoid rainy or foggy days which can hinder drone sensors and cameras.
- Prepare the drone and equipment. Ensure your drone, sensors, and all related equipment are in optimal condition. Charge batteries, calibrate sensors, and update firmware. Pack extra batteries, memory cards, and any necessary accessories.
- Plan the flight path. Pre-program your flight path using photogrammetry software. Set waypoints, altitude, and overlap ratios for images to ensure comprehensive coverage of the targeted area. Tools like DJI GS Pro or Pix4Dcapture can help automate this process.
- Conduct a pre-flight safety check. Before taking off, perform a thorough pre-flight check. This includes inspecting the drone for any physical damage, checking the propellers, ensuring all electronics function correctly, and verifying GPS signal strength and connectivity.
Flying the Mission
- Launching the drone. Find a clear area for takeoff and ensure the home point is well recorded for the return-to-home feature. Take off and allow the drone to stabilize at an initial altitude.
- Begin mission execution. Initiate the pre-planned flight path. Monitor the drone’s progress constantly, keeping an eye on battery levels, signal strength, and camera settings.
- Data capture. As the drone follows the flight path, ensure it captures images at the set intervals. Monitor the image quality and coverage through the controller’s display.
- Monitor environmental conditions. Keep a close watch on changing weather conditions that might affect the flight, such as sudden winds or rain.
- Completing the flight. Once the area has been fully covered, guide the drone back to the landing spot. Perform a safe landing and immediately turn off the drone and camera.
- Post-flight procedures. Download the captured data and check the image quality and coverage. Conduct post-flight equipment checks and store everything securely.
7. Process Your Drone Data
Now you have your drone data. Great! You’re almost there—the only remaining step is to process that data into the outputs we covered above.
After you process the data, you or your client will analyze it so they can actually use it for their work in the field.

Process and Analyze Your Drone Data
- Data import and organization. Begin by importing all captured images into photogrammetry software. Organize the files systematically if not automatically sorted by the software.
- Image processing. Use your photogrammetry software to stitch the images together. This process, known as image alignment and reconstruction, will create a single 3D model or map from your photos.
- Georeferencing. If not done during flight, manually align the stitched images with real-world coordinates to enhance the accuracy of your model or map.
- Quality check. Inspect the processed data for any errors or gaps in the model and reprocess if necessary. Ensure the resolution and accuracy meet the project’s specifications.
- Data analysis. Use tools within the photogrammetry software to analyze the 3D model or map. You can measure distances, calculate volumes, and perform other relevant analyses based on your project needs.
Understand and Apply Data Outputs
- Data interpretation. Understand the different layers and metrics provided by your analysis. This might include topographic data, vegetation indices, or structural measurements, depending on your focus.
- Application of data. Apply the analyzed data to your specific project needs. For example, in construction, use the data for planning and monitoring; in agriculture, use it for crop health assessments and planning interventions.
- Reporting and sharing. Generate reports or export data in formats that can be shared with clients or stakeholders. Ensure that your reports are clear and professionally presented.
- Feedback integration. Use feedback from the application of your data to refine your data collection and processing methods for future missions. Continuous improvement is key to maximizing the value of drone photogrammetry.
Manage Data and Results Storage
If you’re doing drone photogrammetry, you’ll realize really fast that you have a lot of data on your hands. And that’s why it’s important to consider how you’re going to manage all that data.
Here are steps to ensure your data is stored efficiently and securely:
- Choose reliable storage solutions. Opt for scalable storage solutions like Amazon S3, Google Cloud, or Microsoft Azure to handle large photogrammetry datasets effectively.
- Organize data effectively. Create a systematic organization structure for your data by project, location, and date, and use metadata tagging to enhance searchability.
- Implement regular data backups. Automate backups to ensure they occur regularly and store multiple copies in different locations to mitigate data loss risks.
- Control access. Use encrypted connections and secure authentication to control access to sensitive information, updating permissions as necessary.
- Manage data lifecycle. Define clear policies for how long to retain data and when to delete it based on legal and project requirements.
- Ensure compliance and regular audits. Regularly review your data handling and storage practices to comply with industry regulations concerning privacy and airspace use.
- Optimize and upgrade storage solutions. Continually assess and upgrade your storage systems to handle increasing data volumes and enhance processing capabilities.
Drone Photogrammetry FAQ
What is drone photogrammetry?
Drone photogrammetry involves using drones equipped with cameras to capture aerial photographs, which are then processed using specialized software to create detailed 3D models and maps of the surveyed area.
What equipment is needed for drone photogrammetry?
The essential equipment includes a drone with a high-resolution camera, GPS for geotagging photos, appropriate photogrammetry software for processing the images, and sometimes additional sensors depending on the complexity of the project.
How accurate is drone photogrammetry?
The accuracy of drone photogrammetry can vary but typically reaches within a few centimeters of precision, heavily dependent on the drone’s camera quality, the flying altitude, and the software used for image processing.
What are common applications of drone photogrammetry?
Common applications include topographic mapping, construction and mining monitoring, environmental research, agriculture (for crop monitoring), and historical site documentation.
What are the benefits of using drones for photogrammetry?
Drones offer a cost-effective, flexible, and efficient method for gathering high-resolution aerial data. They can access difficult or dangerous terrain and provide data faster than traditional survey methods.
What are some challenges associated with drone photogrammetry?
Challenges include navigating varying weather conditions, ensuring data privacy and security, dealing with airspace regulations, and the need for technical expertise to process and analyze the photographic data effectively.
How do I choose the right drone for photogrammetry?
Choosing the right drone involves considering factors such as payload capacity, flight time, GPS accuracy, camera resolution and stability, and compatibility with photogrammetry software.
Is special training required to perform drone photogrammetry?
Yes, special training is often required to operate the drones safely and effectively, particularly in understanding how to capture images suitable for photogrammetric processing and in using the software to analyze the data. If you’re looking for resources, consider taking our Drone Mapping Essentials course.
Can any drone be used for photogrammetry?
Not all drones are suitable for photogrammetry. Drones used for photogrammetric surveys typically require high-resolution cameras, stable flight capabilities, and precise GPS functionality to ensure the accuracy and quality of the data collected.
Drone Photogrammetry Glossary
You may have noticed that there is a lot of technical jargon in the world of drone photogrammetry. Here’s a short glossary to help you get up to speed with all the terms used throughout this article.
- Photogrammetry. The science of making measurements from photographs. In drone applications, it involves using drone-captured images to create maps, 3D models, or other datasets.
- LiDAR. A remote sensing method used in some drones that uses light in the form of a pulsed laser to measure variable distances to the Earth.
- Orthomosaic. A detailed, accurate photo representation of an area, created out of many overlapping photos from drone flights, stitched and geometrically corrected such that the scale is uniform.
- Point cloud. A set of data points in space produced by 3D scanners, such as drones equipped with photogrammetry or Lidar sensors. Point clouds represent the external surface of an object or the ground.
- Digital surface model. A representation that captures both the natural and built/artificial features on the Earth’s surface.
- Digital elevation model. A bare-earth model that only includes the natural features of the terrain, excluding buildings and vegetation.
- Ground sampling distance. The distance between two consecutive pixel centers measured on the ground. It represents the spatial resolution of the image.
- Remote sensing. The process of detecting and monitoring the physical characteristics of an area by measuring its reflected and emitted radiation from a distance, typically from aircraft or satellites.
- Geo-referencing. The process of assigning real-world coordinates to each pixel of the digital image. Often requires ground control points that are marked by GPS coordinates.
- Ground control point. A physical marker on the ground that has a known geographic location. Used to calibrate and enhance the accuracy of aerial and satellite image data.
Types of Drone Photogrammetry Data Outputs
- Orthomosaics. Detailed, accurate photo representations of an area, created by stitching together many overlapping photographs for mapping and measurements.
- Digital Elevation Models (DEMs). Elevation data of the terrain’s surface excluding objects like buildings or trees, used in geological and hydrological applications.
- Digital Surface Models (DSMs). Includes all objects on the surface such as buildings and vegetation, used in urban planning and landscape modeling.
- Digital Terrain Models (DTMs). A ‘cleaned’ subset of DEMs that removes objects from the surface, providing a bare-earth elevation model.
- 3D Point Clouds. Collections of data points in a coordinate system representing an object’s external surface, used for creating 3D CAD models.
- Volume Calculations. Critical for industries like mining and construction where accurate volume measurements are necessary.
- Contour Lines. Generated from DTMs to illustrate topography on maps, useful in planning and land management.
- 3D Textured Mesh. Combines photorealistic textures with 3D geometry of the surveyed area, used for simulations and virtual reality applications.
Industries & Sectors that Use Drone Photogrammetry
Drone photogrammetry is revolutionizing a range of industries by providing detailed aerial data that was once expensive or impossible to obtain. This technology supports everything from planning and monitoring to modeling and analysis across diverse sectors.
Here are some of the top sectors using drone photogrammetry in their work, along with use cases to illustrate how people are actually using drones in these lines of work.
1. Construction

In construction, drone photogrammetry plays a pivotal role in site surveying and project monitoring, helping teams keep projects on schedule and within budget.
- Site planning. Allows for the precise planning of construction projects by providing detailed topographic maps.
- Volume calculations. Assists in calculating material volumes such as soil and gravel for accurate ordering and use.
- Progress monitoring. Enables frequent and accurate monitoring of construction progress against project timelines.
2. Agriculture

Drone photogrammetry in agriculture aids in crop monitoring and management, enhancing efficiency and productivity through precision agriculture practices.
- Crop health analysis. Identifies unhealthy areas in crops using NDVI indices derived from captured images.
- Yield optimization. Helps in assessing plant counting and biomass estimation which directly correlates to yield predictions.
- Soil erosion assessments. Provides insights into patterns of soil movement and degradation across large areas.
3. Environmental Management
This technology is crucial for environmental conservation, enabling detailed studies of ecosystems and changes over time without disturbing the environment.
- Habitat mapping. Essential for mapping and monitoring habitats of various wildlife species, especially in inaccessible areas.
- Coastal erosion monitoring. Used to track changes in coastlines and the effectiveness of erosion control measures.
- Disaster assessment. Critical in the rapid assessment of damage post-natural disasters such as floods and hurricanes.
4. Real Estate and Urban Planning
Drone photogrammetry transforms real estate marketing and urban planning by providing a new perspective for potential buyers and planners.
- Marketing properties. Offers stunning aerial views that enhance real estate listings and attract more buyers.
- Infrastructure planning. Aids in the planning and development of infrastructure projects within urban environments.
- Historic preservation. Helps document and monitor the state of historical sites over time for preservation efforts.
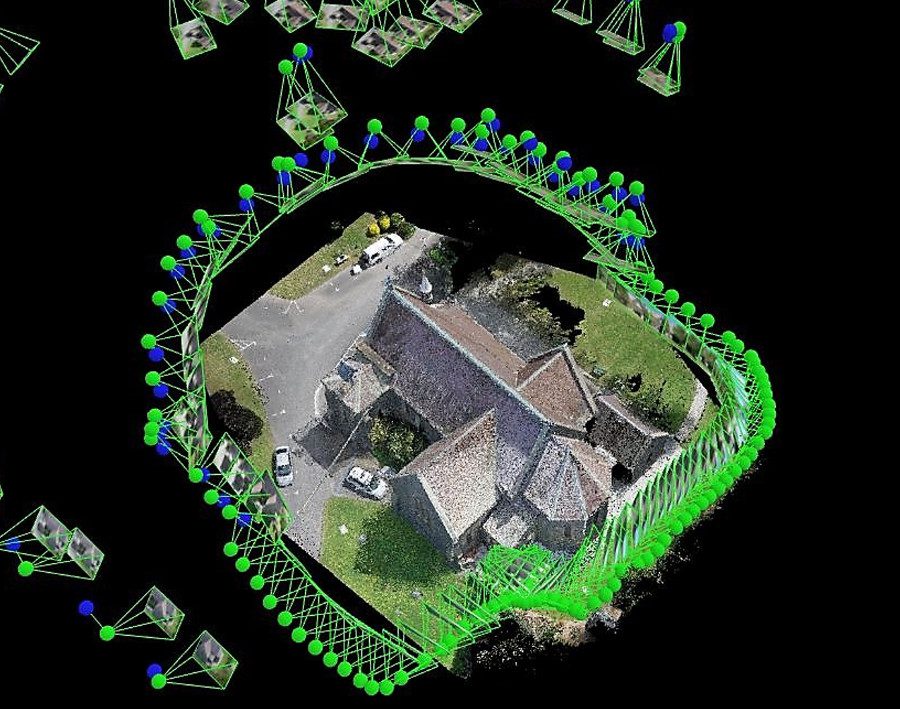
5. Cultural Heritage and Archaeology
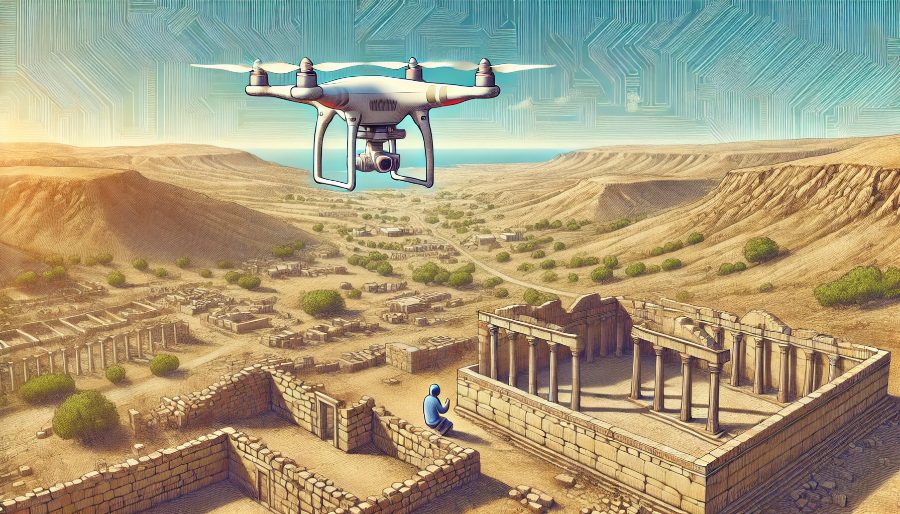
In cultural heritage and archaeology, drone photogrammetry offers a non-intrusive means of documenting and preserving historical sites. This technology enables detailed and accurate reconstructions of archaeological sites, helping in the study and conservation of heritage structures without disturbing them.
- 3D modeling of historical sites. For preservation and detailed study.
- Damage assessment and monitoring. Crucial for restoration projects.
- Virtual tour creation. Provides educational and promotional benefits.
6. Forestry

Drone photogrammetry is revolutionizing forestry management by providing detailed aerial views that facilitate the monitoring and analysis of forested areas. This technology assists in various forestry operations, enhancing sustainability and resource management.
- Tree counting and species identification. Automates the process of counting trees and identifying species over large areas, improving inventory accuracy.
- Health assessment. Detects disease outbreaks and pest infestations early, allowing for timely interventions.
- Change detection. Monitors changes in the forest over time, helping in assessing the impact of environmental factors and human activities.
- Biomass estimation. Provides estimates of forest biomass, which is crucial for carbon stock assessment and sustainable resource management.
Learn more about Drone Mapping Essentials, our online course to help you become proficient in drone mapping.